Installing the Elementor plugin is just the beginning of your website-building journey. To use the full potential of Elementor Pro and start creating stunning, professional websites, there are essential steps you need to take immediately after installation.
Elementor Pro transforms your WordPress experience by providing advanced widgets, theme building capabilities, popup creators, and dynamic content features that aren’t available in the free version.
This guide explains all the details from activating your license to exploring advanced features, we’ll ensure you’re set up for success and ready to build beautiful, functional websites that engage your visitors and drive results.
How to Install Elementor Pro?
Elementor Pro starts at $4.99 per month on annual billing. Beside this there are other Elementor Pro pricing plans you can purchase and download in WordPress.
Once you’ve installed Elementor Pro, the next step is optimizing your workflow with the right supporting tools. For tips on choosing the best add-ons, performance boosters, and design enhancers, explore reliable sources that offer WordPress tools and plugin insights. These resources can help you build faster, cleaner, and more feature-rich websites right from the start.
Follow the steps below to install Elementor Pro.
Step 1: Purchase Elementor Pro from the official Elementor website first.

Step 2: Download the plugin zip file from the purchase confirmation or the dashboard.
Step 3: Go to your WordPress Admin panel through your website, and in the Plugins section, click Add New Plugin.
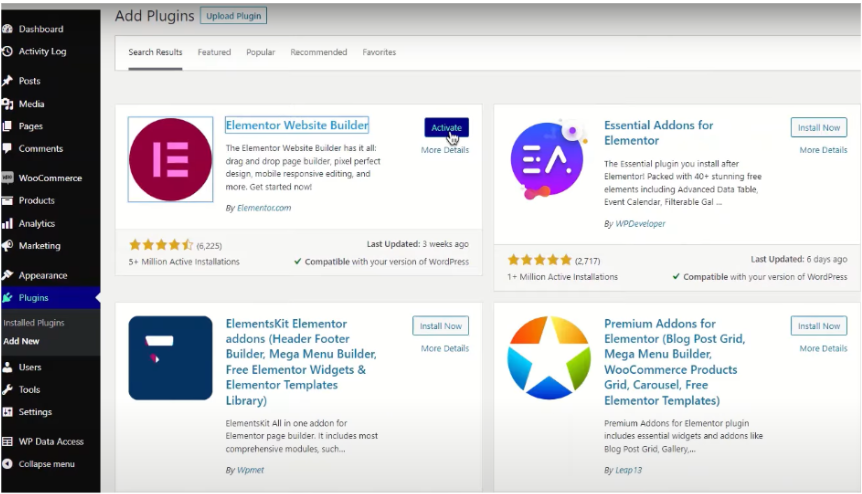
Step 4: When installation completes, click the Activate Plugin button immediately.
Step 5: Enter your Elementor account credentials to complete license activation. Proceed to purchase from the Elementor pricing plans.
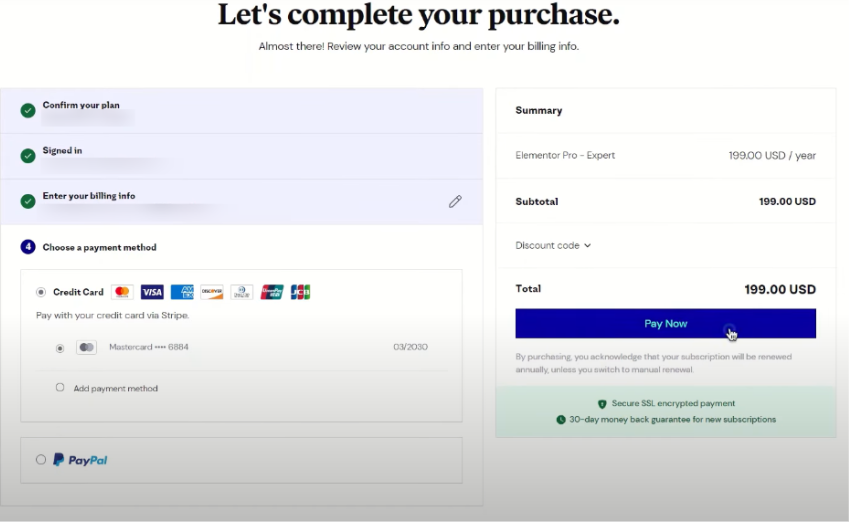
Step 6: Confirm license activation to unlock all Pro widgets’ functionality.
Remember, although Elementor does not offer a free trial, you can use the platform features to enhance your website through WordPress with a 30-day money-back guarantee.
5 Steps To Do After Installing Elementor Pro
Now that you have Elementor Pro installed, these essential steps will unlock its full potential and set the foundation for your website-building success.
Step 1: Activate Your Elementor Pro License
The most crucial step after installation is connecting and activating your Elementor Pro license. Without activation, you won’t have access to any of the premium widgets, templates, or features that make Elementor Pro valuable.
How to activate your license:
Step 1: Visit your WordPress dashboard and look for the “Connect & Activate” button that appears after installation.
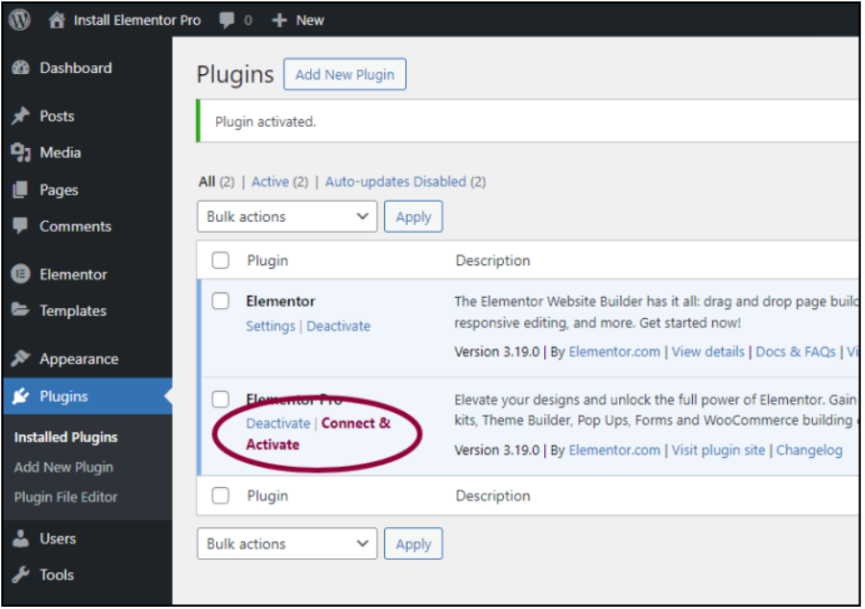
Step 2: Alternatively, go to WP Admin > Elementor > License and click “Connect & Activate.”
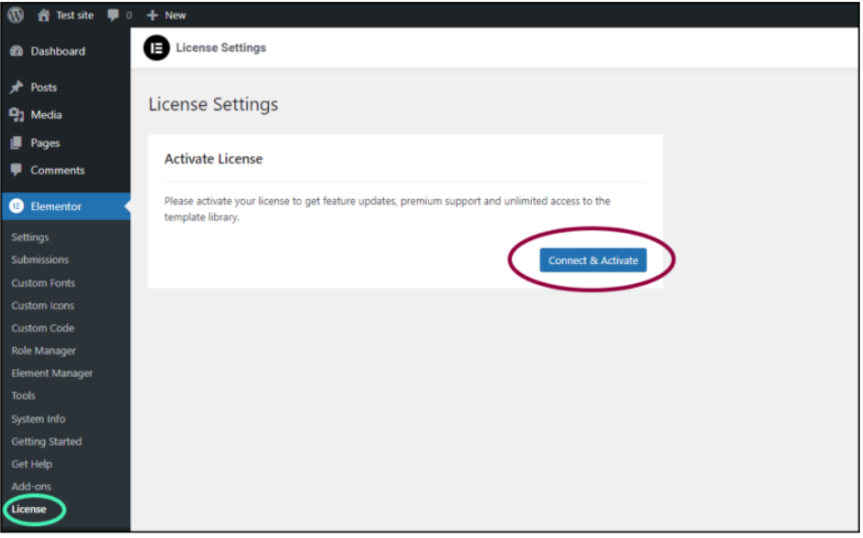
Step 3: Enter your Elementor account credentials (the email and password used during purchase).
Step 4: Select the appropriate one from the dropdown menu if you have multiple subscriptions.
Step 5: Click “Activate my license” to complete the process.
While some users search for more deals, Elementor does not offer lifetime deals. Instead, you can select the best annual plan for your business. Once activated, you’ll receive automatic updates and immediate access to all Pro features.
Step 2: Explore the Theme Builder
Elementor Pro’s Theme Builder is one of its most powerful features. It allows you to design custom headers, footers, single post templates, and archive pages. This tool gives you complete control over your website’s appearance without needing to modify theme files.
Getting started with Theme Builder:
- Access Theme Builder through Elementor > Theme Builder in your WordPress dashboard.
- Start by creating a header template to maintain consistent branding across your site.
- Design a custom footer that includes your contact information, social media links, and important pages.
- Create single post templates to control how your blog posts and pages appear.
- Experiment with archive page layouts to improve how your content categories are displayed.
The Theme Builder uses dynamic content, meaning your designs automatically populate with relevant information from your posts and pages. This feature alone can save hours of repetitive design work while ensuring consistency across your entire website.
Step 3: Discover Pro Widgets And Features
Elementor Pro includes over 50 additional widgets that significantly expand your design possibilities. These premium widgets enable you to create interactive elements, forms, and advanced layouts that aren’t possible with the free version.
Essential Pro widgets to explore:
- Forms Widget: Create contact forms, newsletter signups, and lead generation forms without additional plugins.
- Posts Widget: Display your blog posts in custom layouts with filtering options.
- Testimonials Widget: Showcase customer reviews and social proof effectively.
- Price Table Widget: Build compelling pricing pages for your products or services.
- Countdown Timer Widget: Create urgency for special offers and events.
Additionally, explore features like motion effects, custom CSS capabilities, and global widgets that can be reused across multiple pages. In 2023, Elementor took a giant leap forward by introducing Elementor AI. It brought the power of AI directly into the hands of web designers, revolutionizing the website-building process.
Step 4: Utilize Templates and Blocks Library
Elementor Pro provides access to hundreds of professionally designed templates and blocks that can dramatically speed up your website creation process. These pre-built designs serve as excellent starting points to customize to match your brand.
Maximizing the template library:
- Access templates by clicking the folder icon when editing any page with Elementor.
- Browse templates by category, including business, portfolio, landing pages, and e-commerce.
- Use blocks (individual sections) to add specific functionality like testimonials, pricing tables, or contact sections.
- Import entire page templates or individual blocks with one click.
- Customize colors, fonts, and content to match your brand identity.
The template library is regularly updated with new designs, ensuring you always have fresh options. These professionally designed templates are mobile-responsive and optimized for performance, providing a solid foundation for your website.
Step 5: Configure Global Settings And Check for Updates
Establishing global settings ensures consistency across your website and creates a cohesive brand experience. Additionally, keeping Elementor Pro updated is crucial for security, performance, and access to new features.
Setting up global configurations:
- Navigate to Site Settings in the Elementor editor to establish default colors and fonts.
- Configure global widgets that can be reused across multiple pages.
- Set up default styling for headings, buttons, and other common elements.
- Review and adjust performance settings to optimize loading times.
Maintaining your installation:
- Enable automatic updates to ensure you receive security patches and new features.
- Regularly check the Elementor dashboard for notifications about available updates.
- Back up your website before major updates to prevent potential issues.
- Monitor your website’s performance after updates to ensure everything functions correctly.
Regular updates not only keep your website secure but also provide access to new widgets, templates, and features that Elementor releases throughout the year.
Advanced Configuration Tips
After completing the basic setup, consider these advanced configurations to maximize your Elementor Pro experience:
- Performance Optimization: Review your website’s loading speed and optimize images, enable caching, and minimize CSS/JavaScript files. Elementor Pro includes built-in performance features that, when properly configured, can significantly improve your site’s speed.
- Integration Setup: Connect Elementor Pro with your email marketing service, CRM, or analytics tools. These integrations enable you to capture leads effectively and track your website’s performance through detailed analytics.
Troubleshooting Common Issues
Even with proper setup, you might encounter some common challenges when using Elementor Pro:
1. License Activation Problems: Ensure you’re using the correct email address from the purchase. Clear browser cache and check internet connectivity before retrying activation.
2. Template Import Failures: Increase server memory limit or temporarily deactivate conflicting plugins. Large templates may require higher server resources to import successfully.
3. Missing Pro Widgets After Installation: Verify that license activation is complete. Pro widgets only appear after a successful license connection and may require a page refresh.
4. Plugin Conflicts with Other WordPress Plugins: Temporarily deactivate other plugins to identify conflicts. Caching and SEO plugins commonly interfere with Elementor Pro’s functionality and performance.
5. Slow Website Loading Speed: Optimize images, enable caching, and limit excessive widgets per page. Too many animations and effects can significantly impact loading times.
6. Theme Compatibility Issues: Switch to Elementor’s Hello theme or ensure your current theme follows WordPress coding standards for optimal Elementor Pro compatibility.
7. White Screen or Fatal Errors: Increase PHP memory limit in hosting settings. Contact the hosting provider if you lack access to the server configuration files.
Conclusion: After Installing, Activate Your Elementor Pro License!
Successfully setting up Elementor Pro after installation is important for unlocking its full potential and creating professional websites efficiently.
By activating your license, exploring the Theme Builder, discovering Pro widgets, utilizing templates, and configuring global settings, you’ll establish a solid foundation for all your future web design projects.
After completing the proper setup, you’re ready to transform your website ideas into reality using one of WordPress’s most capable page builders.
FAQs
License activation typically takes just a few minutes once you have your login credentials ready.
Depending on your subscription plan, which ranges from 1 to 1,000 sites.
Elementor Pro is designed for users without coding experience using drag-and-drop functionality.
You won’t have access to Pro widgets, templates, updates, or support without activation.
You can change templates anytime, though customizations may need adjustment for optimal results.
