Building a website used to take hours of effort, but with Elementor AI, that’s no longer the case. This smart feature inside the Elementor editor helps you create content, images, layouts, and even code with just a few clicks.
Whether you’re a beginner or an experienced designer, Elementor AI makes the web design process faster and more creative.
In this guide, we’ll walk you through how to use Elementor AI, explore its features, pricing plans, and how it can help you bring your ideas to life with ease.
Let’s get started!
What Is Elementor AI?
Since its launch in 2016, Elementor has been a game-changer in website-building. Known for its user-friendly drag-and-drop interface, It has made web design accessible to millions of users worldwide.

In 2023, Elementor took a giant leap forward by introducing Elementor AI. This move came at a time when artificial intelligence was making waves across various industries. Elementor AI brought the power of AI directly into the hands of web designers, revolutionizing the website-building process. This feature is available for free with Elementor plans.
Elementor AI isn’t just a single feature – it’s a suite of AI-powered tools integrated seamlessly into the Elementor editor. Its core features include:
- AI-powered text generation
- Image creation and manipulation
- Layout suggestions
- Custom code generation
- SEO optimization
These features work together to make web design faster, more efficient, and more creative than ever before.
Things You Need Before Starting With Elementor AI
Before diving into Elementor AI, make sure you have:
- An Elementor account
- The latest version of the Elementor plugin was installed and activated
- If you’re a Pro user, ensure you have the latest Pro version
- A WordPress website where you can use Elementor
- An active Elementor AI subscription or free trial
How To Use Elementor AI? (Step-by-Step)
Using Elementor AI is straightforward. Here’s a step-by-step guide:
Step 1. Log into your WordPress dashboard and open a page or post with Elementor. (Make sure you have an active Elementor AI subscription)
Step 2. Look for the AI icon in the Elementor editor. It’s usually found near text fields, image placeholders, and in the main Elementor panel. Click on the AI icon to open the AI assistant interface.

Step 3. Choose the task you want AI to help with – writing text, creating images, suggesting layouts, or generating code.
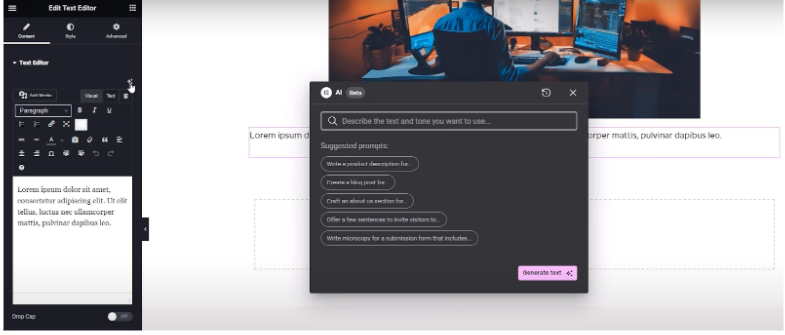
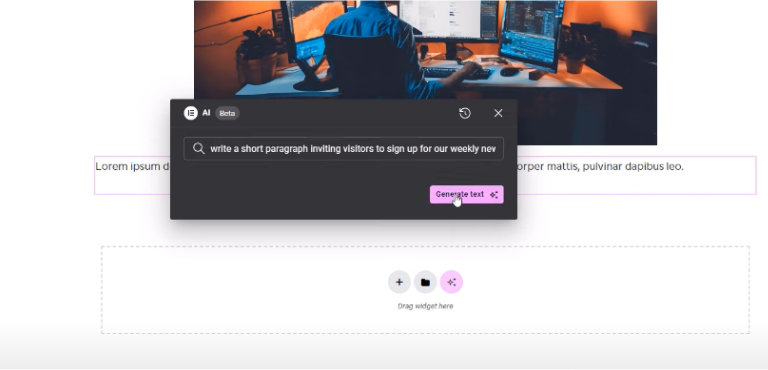
Step 4. Provide a prompt or description of what you want. Be as specific as possible for best results.
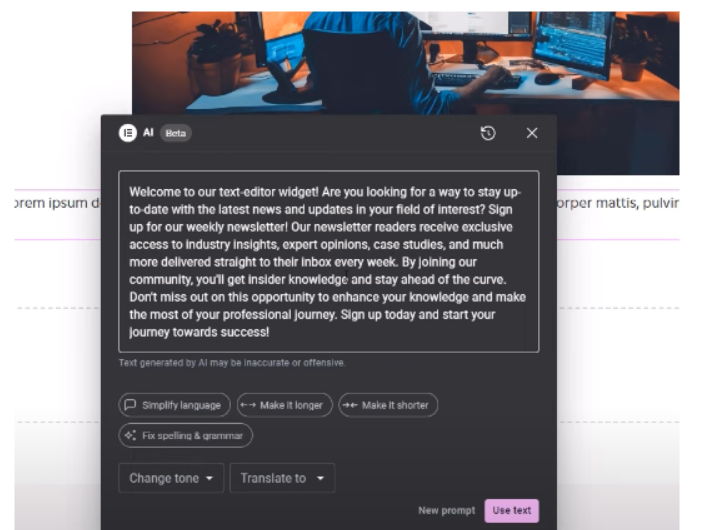
Step 5. Review the AI-generated content. You can regenerate if you’re not satisfied or make manual edits. Once you’re happy with the result, click to apply the changes to your page.
Step 6. Repeat this process for other elements on your page as needed.

Remember, Elementor AI is a tool to assist you, not replace your creativity. Always review and refine the AI-generated content to ensure it aligns with your vision and brand.
Things You Can Do With Elementor AI
Here are some amazing things you can do with Elementor AI during website creation:
1. Create Engaging Content
With Elementor AI, writer’s block becomes a thing of the past. Simply provide a topic or outline, and the AI will generate well-structured, engaging content for your website. You can adjust the tone, style, and length to suit your needs.
2. Design Custom Layouts
Stuck on how to structure your page? Elementor AI can suggest layout ideas based on your content and goals. It analyzes design trends and best practices to offer attractive and functional layouts.
3. Generate And Edit Images
No more endless searches for the perfect stock photo. Elementor AI can create custom images based on your descriptions. You can also use AI to edit existing images, adjust colors, remove backgrounds, or even change elements within the image.
4. Write Custom Code
For those who need specific functionality, Elementor AI can generate custom HTML, CSS, and JavaScript code. Just describe what you need, and the AI will provide code snippets that you can easily integrate into your site.
5. Optimize For SEO
Elementor AI helps you create SEO-friendly content. It can suggest keywords, optimize meta descriptions, and even rewrite content to improve its search engine ranking potential.
Elementor AI Pricing
Elementor AI offers two pricing tiers to suit different needs:
| Plan | Price | Credits | Features |
|---|---|---|---|
| AI Starter | $3.99/month (billed annually) | 24,000 | Generates text, code, images; Builds container layouts; AI Context; AI Copilot |
| AI Power | $8.25/month (billed annually) | 50,000 | All Starter features plus more credits and longer history storage |
| AI Visionary | $15.99/month (billed annually) | 100,000 | All Power features + Priority processing, exclusive AI-generated design templates, unlimited AI Copilot usage, and enhanced automation for site-building. |
All plans cover unlimited Elementor websites and work with Elementor 3.13 and higher.

Luckily, Elemetor AI is free with any Elementor website plan you purchase (with limited credits). The plans are best suited for those who need more credits for different tasks. If you want to get it for free, purchase Elementor Pro at a discount.
Conclusion: Elemetor AI Makes Complex Tasks Easier!
Elementor AI is a powerful tool that’s changing the landscape of web design. It brings the power of artificial intelligence to your fingertips, allowing you to create stunning websites more efficiently than ever before.
From content creation to layout design, and image generation to code writing, Elementor AI offers a wide range of capabilities that can significantly speed up your web design process. It’s not just about saving time – it’s about unleashing creativity and achieving results that might have been out of reach before.
Remember to use Elementor AI responsibly. While AI is a powerful tool, it’s meant to enhance your creativity, not replace it. Always review and refine AI-generated content to ensure it aligns with your brand and meets your specific needs.
FAQs
No, Elementor AI is available with both the free and Pro versions of Elementor. However, having Elementor Pro unlocks more advanced widgets and design flexibility, which complements AI features well.
Yes, Elementor AI generates unique content based on your input. However, it’s always recommended to review and personalize the output to match your brand tone and SEO goals.
Elementor AI does not build entire websites from scratch in one click. Instead, it assists you in designing and developing sections by generating text, images, layouts, and code based on your prompts.
